The Best Hummus + How Long Does Fresh Hummus Last?
This creamy, delicious dip might be a fridge staple, but its lifespan remains a mystery. Fear not, friend! Dive in and discover just how long does fresh hummus last before it turns south. Plus, Kate’s absolute best hummus recipe!
Last week I was desperate for a snack. The hummus sat there, beckoning. Creamy and inviting, nestled in its container, it whispered promises of pita bread soldiers and veggie dippers.
But a shadow of doubt lingered: how long had it been in the fridge? And left me wondering how long hummus lasts.
Today, we embark on a culinary quest, armed with science and storytelling, to uncover the truth about fresh hummus’s longevity. So, grab your pita bread, settle in, and let’s answer the age-old question: how long does hummus lasts, truly?
Plus don’t miss my best hummus recipe (scroll down, you won’t regret it!), bursting with vibrant flavors and silky texture, it will become your go-to.
How Long Does Fresh Hummus Last?

While most articles might tell you to store hummus in the fridge for a generic “3-4 days” for homemade and up to 7 days for store-bought hummus. Lesser-known hacks like increasing the lemon juice, decreasing the amount of time at room temperature, and storing in a deep, narrow container make your hummus a long-lasting, flavor-packed companion.
Imagine whipping up a batch on Sunday, enjoying it all week, and still having some left for that impromptu movie night with the kids. Sounds pretty sweet, right? Let’s dig in to how we get the longest-lasting, best quality homemade hummus.
FYI, store-bought, unopened hummus that is sealed can last in the refrigerator for up to 2 months.
The Shelf Life Of Hummus
First, let’s shatter the myth: homemade doesn’t have to spoil faster than store-bought.
It’s true, preservatives in commercial brands offer an edge, but with the right knowledge, you can create a homemade hummus that rivals their longevity. Here’s the real secret: it’s all about understanding the science of spoilage and employing clever tactics, like, for example, using clean utensils every time you spoon into the hummus to prevent cross-contamination.
Remember your high school chemistry lessons? Bacteria loves warmth and moisture, both enemies of your hummus.
So, the first weapon in your arsenal is the fridge: store your hummus in an airtight container immediately after blending. A deep container exposes less surface area to air, further slowing down bacteria growth.
Take small portions out of the original container instead of leaving it out at room temperature. The USDA Food Safety and Inspection Service warns that fluctuations in temperature can trigger spoilage faster. Aim for consistent fridge temperature (around 40°F) for a longer shelf life.
Next, let’s talk olive oil: it’s not just for drizzling!
According to Science Direct, a thin layer of olive oil on top creates a barrier, preventing oxygen from reaching the hummus and slowing down oxidation (that browning you don’t want). Remember, freshness matters here – use high-quality extra virgin olive oil with high polyphenols, as they have stronger anti-bacterial properties that can prevent food poisoning.
A squeeze of fresh lemon juice not only brightens the flavor but also lowers the pH level, creating an inhospitable environment for bacteria.
Types Of Hummus Make A Difference

But what about those ingredients hiding in your hummus?
Here’s where things get interesting. If you’ve bought hummus from the grocery store that has ingredients like pine nuts, spices, or fresh herbs on top of the hummus, know they can become rancid faster.
Freezing: Your Secret Weapon for Hummus Immortality (Almost)
Let’s face it, even with these tips, sometimes you make more hummus than you can devour. No worries! Did you know leftover hummus freezes beautifully?
Portion it into an individual sealed container (make sure it’s a freezer-safe container) or a freezer bag, leaving some headspace for expansion, and pop them in the freezer.
Just remember, ingredients react differently: freeze plain hummus for best results, as some herbs or toppings can affect texture upon thawing.
Thaw frozen hummus in the fridge overnight. But before diving in, give it a good stir to redistribute any separated ingredients.
Trust Your Senses
While extended shelf life is fantastic, it’s crucial to remember the ultimate judge – your senses. Spoiled hummus won’t announce its presence with flashing lights, so here’s your guide to sniffing out any trouble:
Sight: Of course if it is store-bought, first check the expiration date. The best way to tell if fresh hummus is bad hummus is to look for discoloration, particularly darkening or the presence of mold, signifies spoilage.
Taste: Fresh hummus is creamy, smooth, and flavorful. If it tastes sour, bitter, or simply “off,” it’s time to say goodbye. Remember, a slight tang from lemon juice is normal, but anything beyond that suggests signs of spoilage.
Smell: Your container of hummus should have a pleasant, earthy aroma with hints of lemon, garlic, and tahini. A sour smell or pungent, off-putting odor indicates bacterial growth.
Ingredients To Make Homemade Hummus
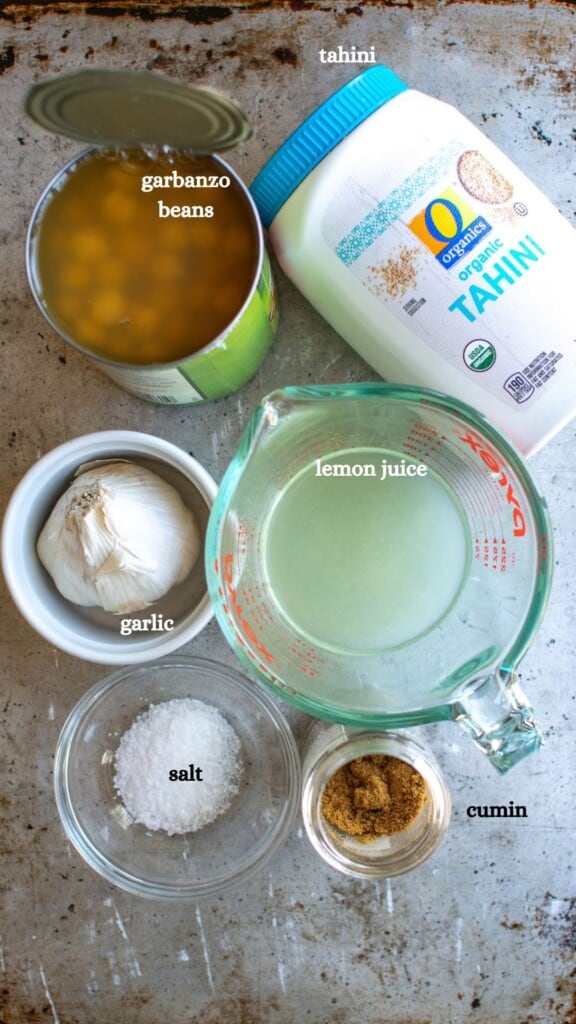
- Canned garbanzo beans
- Fresh lemon juice
- Tahini
- Garlic
- Kosher salt
- Ground cumin
- Roasted red peppers, for garnish (optional)
How To Make This Recipe

This secret to this recipe is utilizing the liquid in the can of garbanzo beans (also known as aquafaba). It makes a silky smooth and utterly delicious hummus. Making sure it is ice cold, helps the hummus become light and airy.
step one
Drain the beans. Drain the can of chickpeas through a sieve over a bowl, catching the liquid in the bowl. Measure 1/3 cup of the liquid and add 2-3 ice cubes. Stir.

step two
Blend. Combine lemon juice, tahini, garlic, salt, and cumin in the food processor. Blend until the consistency of peanut butter.
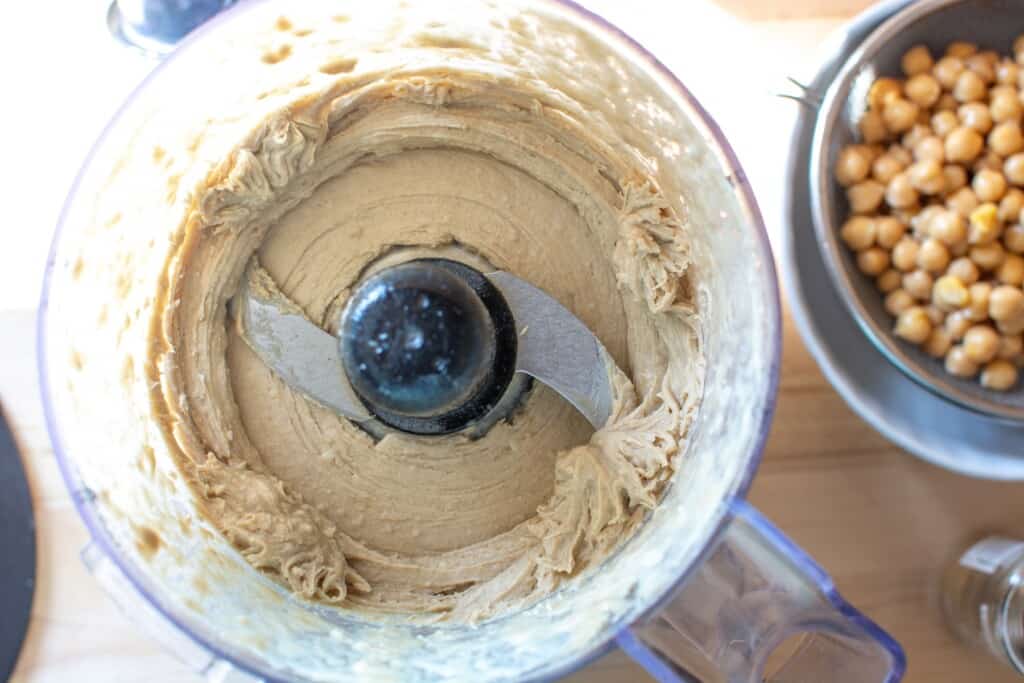
step three
Add back liquid. With the machine running slowly pour in the cold aquafaba until it is silky smooth.
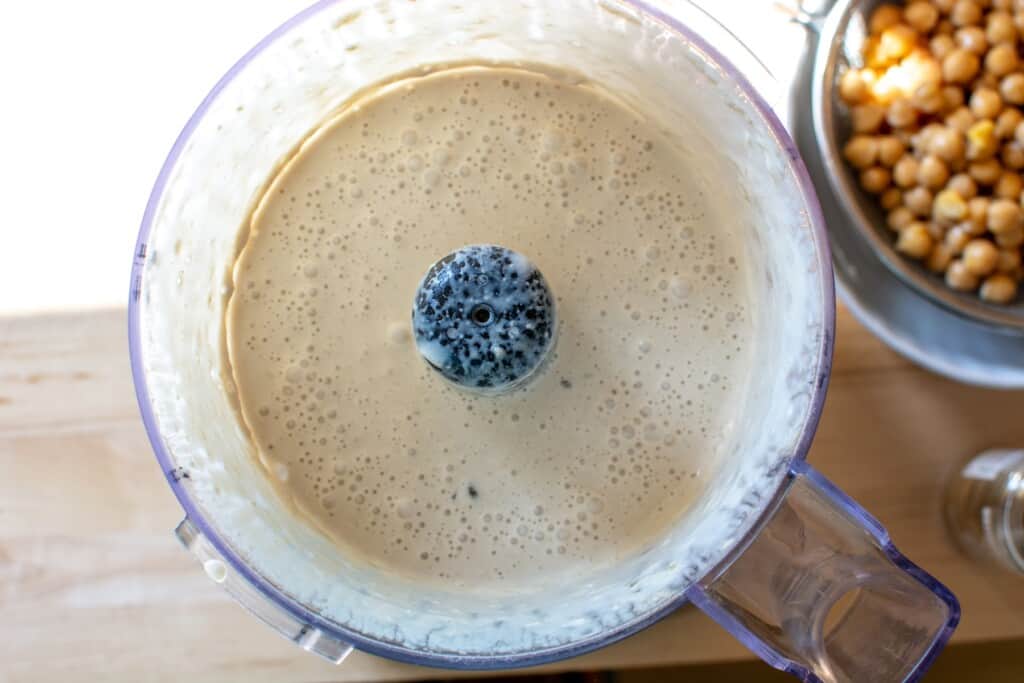
step four
Serve! Add the beans and keep processing until it is smooth and creamy. Taste and add more salt and/or lemon juice as needed. Enjoy with pita chips or vegetables for dipping.

You’ve Got Questions, I’ve Got Answers:
- How To Tell If Fresh Cranberries Are Bad
- How To Reheat Thanksgiving Sides
- What To Make With Frozen Butternut Squash
- How To Blanch Broccoli
- How To Melt Chocolate
Hummus Mystery Solved!
Armed with these lesser-known tips and my best homemade hummus recipe, you’re ready to create your own hummus that you won’t have to enjoy with a side of caution. When you try it, let me know how it went! Share a photo and tag me on Instagram using @katesbestrecipes so that I can see (don’t forget to leave a ⭐️⭐️⭐️⭐️⭐️ rating)! Also, sign up for my weekly recipe newsletter so you never miss a thing.

Kate’s Best Hummus Recipe
Ingredients
- 1 15-ounce can garbanzo beans
- 1/2 cup tahini
- 1/4 cup freshly squeezed lemon juice
- 2 cloves garlic
- 1 teaspoon kosher salt
- 1 teaspoon ground cumin
- 1/4 cup chopped roasted red peppers, for serving (optional)
- 2 tablespoons chopped Italian parsley, for serving (optional)
- 1 teaspoon white sesame seeds, for serving (optional)
- extra virgin olive oil, for serving (optional)
Instructions
- Drain the can of garbanzo beans through a fine mesh strainer set over a bowl to catch the liquid. Measure 1/3 cup of the liquid and add 2-3 ice cubes, stir.
- Combine tahini, lemon juice, garlic, salt, and cumin in a food processor fitted with the blade attachment. Process until smooth and the consistency of peanut butter. Scrape down the sides with a rubber spatula.
- With the machine running, slowly pour in the cold canning liquid (aquafaba) with the ice and everything. Stop the machine and scrape down the sides again.
- Add the beans and keep processing until the hummus is smooth and creamy. Stopping to scrape down the sides as necessary.
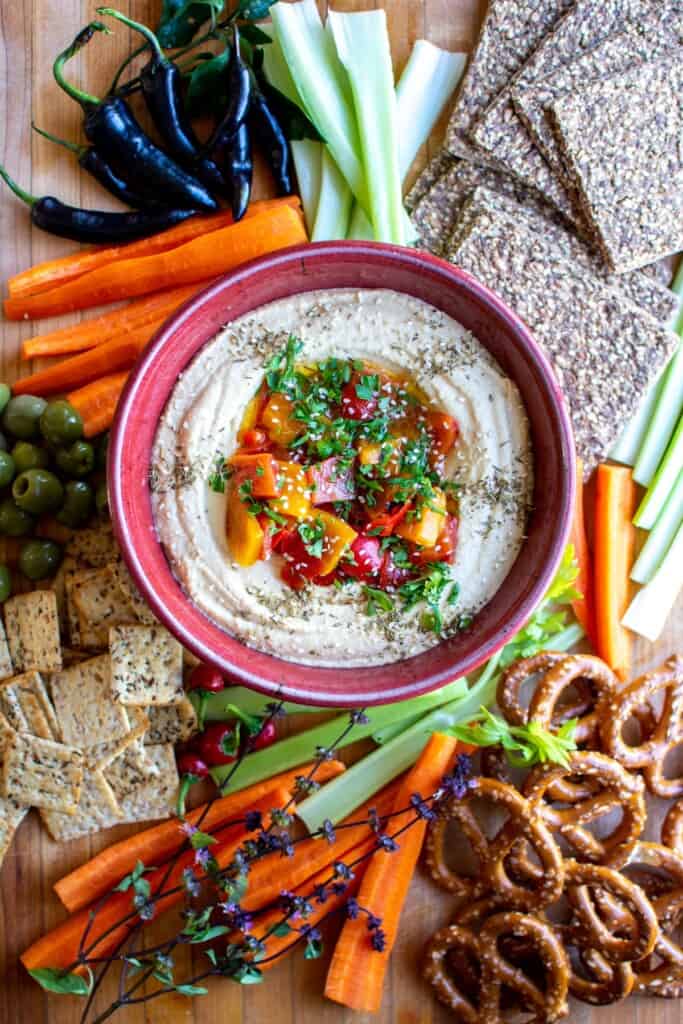
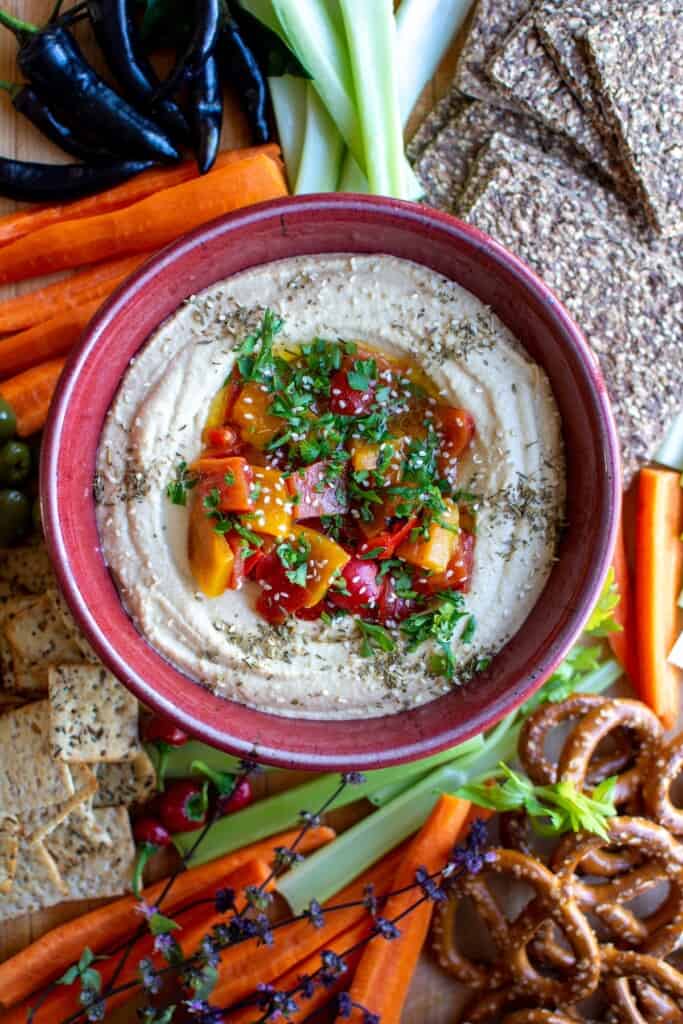
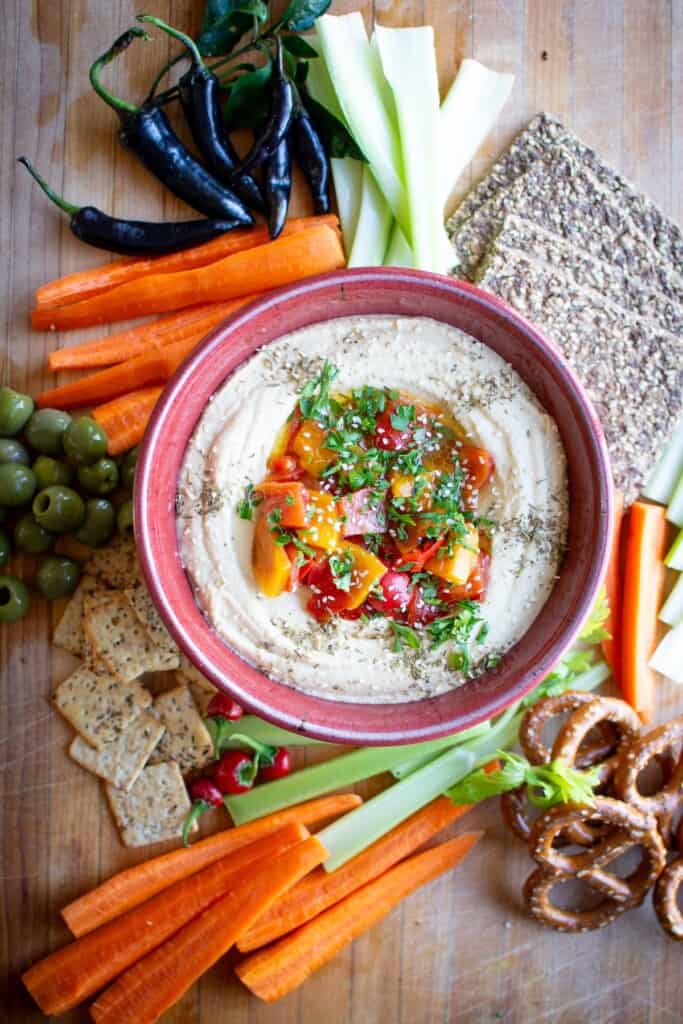
- Taste and add more salt or lemon juice if needed. Spoon into a serving dish and top with chopped roasted red peppers, parsley, sesame seeds and a generous drizzle of olive oil.
Notes
- Storage/Make-ahead: Leave-off the toppings and store in a deep, narrow airtight container. Drizzle a thin layer of extra virgin olive oil over the top and keep in the fridge for up to a week or in the freezer for up to 3 months.
- Serving: Only take out as much as you need and spoon into a shallow bowl. Top with the roasted red peppers, parsley, sesame seeds and a drizzle of olive oil. Serving with veggies and warm pita wedges or pita chips.
- Blending. If you have a Vitamix, this is the time to use it. This high-powered blender will make the hummus extra smooth.
- Tahini: Buy tahini in a plastic container (Tazah brand is my favorite) that way you can squeeze and mix it well before measuring. The tahini should have a smooth consistency before measuring and mixing into the hummus.
Video
In support of this small business, Kate’s Best Recipes earns revenue in a few different ways. Several sponsored posts are published each month. I also earn an affiliate commission on the sales of products I link to— there are a few of those links in this post. I only feature items I genuinely love and personally use on a regular basis. This commission is an arrangement between the retailer and Kate’s Best Recipes (readers never pay more for products). This income allows me to run the site. Thank you for reading!


Excellent recipe!
Thank you so much Lisa! I’m so thrilled you loved it.
I use a similar recipe, but will put 1 tbsp of olive oil in the food processor after adding the chickpeas. This helps it stay fresh longer. I also use cayenne pepper to give it a bit of a kick.
Great tip and I love the addition of something spicy! I’ll have to give that a try.